Wednesday 10 April 2024

The Savage Storm: The Battle for Italy 1943 by James Holland


James Holland, along with Peter Caddick-Adams and Alex Kershaw, forms my favorite trio of World War II military historians. For me, Holland, in particular, has become a niche writer, covering topics not frequently addressed by other writers (such as the Malta book) and adopting distinctive new angles when interpreting extensively researched battles or campaigns (as seen in the Normandy '44 book or the two tomes on the War in the West, 1940-43). For this reason, I tend to buy and read any new publication by him.

The Savage Storm: The Battle for Italy 1943 is Holland's latest book published in September 2023. As usual by the author, this is a thick tome of circa 600 pages, including a useful map section and lavishly illustrated with both contemporary photos and others taken by the author while walking the main battlefields 

The book epitomizes Holland’s approach. As the author rightly points out in the book's final pages, "the war in Italy is largely forgotten today, except for Cassino and Anzio…" Additionally, he covers in detail the poor design and execution of the campaign by both the Allies and the Germans. The result is a harrowing, brutal, and ultimately futile campaign, with casualty rates in the contending armies surpassing those of the Great War and inflicting a level of suffering on the Italian people hardly seen in other war theaters in the West.

"The Savage Storm" picks up where Holland's previous book, "Sicily '43," left off, with the retreat of Axis forces through the Messina Strait into Calabria, and concludes in December 1943 with the Allies halted at the Gustav Line in west-central Italy and at Ortona on the Adriatic coast. During this period between September and December 1943, the Allied Fifth and Eighth Armies suffered close to 35,000 losses, while the German Tenth Army endured 13,400.

The campaign faced numerous problems from the outset on the Allies’ side. The decision-making process was muddled by strategic political considerations and a significant disagreement between Britain and the US regarding where to concentrate the center of gravity in the West.

Political considerations included the fear of losing the initiative after Sicily if Italy was not assaulted, the presence of a powerful but inactive army in the Mediterranean, pressure from the Soviets on the Western Allies to open a second front in Europe, Prime Minister Churchill's ambition to extend British influence in the Mediterranean, British concerns that the US might prioritize the Pacific if no progress was made in Europe, and the opportunity to use Italy as a launching point for Allied air attacks on German and Austrian manufacturing centers.

The disagreement between US and British political and military commanders revolved around the center of gravity of Allied strategy in Europe. The US favored focusing efforts on assaulting France in May 1944, considering Italy as an undesirable distraction that could divert significant military assets from the main campaign. Conversely, for the British, Italy presented an opportunity to attack the Reich from its perceived "soft belly," remove Italy from the war, and force the Germans to divert resources from France.

Ultimately, the Allies greenlit the invasion of Italy but committed half-heartedly to the operation. There were no clear medium-term objectives set at its inception, aside from establishing advanced bases for the Air Force bombing campaign on the Reich or capturing Rome (more a political than a military objective). Many planning assumptions proved unfounded, lacking supporting intelligence evidence, such as the belief that the Germans would retreat to northern defensive lines without contesting Allied landings in the South. Moreover, the allocated resources were insufficient for the task, exemplified by the near disaster of the Salerno landings, and were further constrained by preparations for Operation Overlord.

Allied challenges multiplied as the mountainous terrain, numerous east-west flowing rivers, lack of modern road networks, and deteriorating weather hindered their ability to leverage mechanized mobility and air supremacy.

On the German side, the popular perception of a masterful army conducting strategic retreats and fighting to the last man hardly withstands scrutiny. The reality was an army poorly led by "Smiling Albert" (Kesselring) and hampered by Hitler's political interference and obsession with holding every inch of ground.

The Germans engaged in an unwinnable war of attrition, depleting irreplaceable human resources and diverting forces from other fronts. Once the main airfield at Foggia was captured, the strategic rationale for continuing to fight in southern Italy faded.

Ultimately, it was the Italian civilians who suffered the most, caught in the crossfire between the Allies, the Germans, and the incompetence of fascist leaders. James Holland vividly portrays their suffering, from mass killings and rapes by the Germans to the destruction caused by Allied offensives and the lack of effective Allied planning for the conquered territories, exacerbated by German destruction of infrastructure essential for survival.

There are no reliable statistics on civilian fatalities due to bombings, battle casualties, hunger, and diseases, highlighting the extent of civilian suffering during this brutal campaign, but they are surely counted by tenths of thousands.

This book is a must-read for anyone interested in the Mediterranean front during the Second World War. It provides much-needed information on the subject, and the author has announced on his Twitter account that a follow-up book is coming. The follow-up book will focus on the Monetcassino campaign and the Anzion landings that led to the liberation of Rome. It’s worth noting that Holland has written a book covering the 1944-45 period titled “Italy’s Sorrow,” completing the military history quadrology.

Wednesday 31 January 2024

Painting Challenge Report #3

A spell of extremely and abnormal warm and sunny weather last week in Madrid, facilitated undusting my airbrush to work outdoors on a couple of 28mm 2WW Allied vehicles for the challenge.

First, a late war British 4-wheeled Humber Mk IV  used in the recon sections of the British and Commonwealth divisions. Over 6,000 were produced during the war (of the different versions) and saw post-war action up to the 60s: the latest in record, an obscure colonial conflict  in Asia between Portugal and India for the control of Goa, where the Humber featured among the recon squadrons of the Portuguese forces.


This kitl has been painted in the olive green and "Mickey Mouse" cammo scheme widely used in the Western Europe campaigns of 1944-45


This is an old Warlord resin model with metal fittings, which incidentally has been recently replaced with  (in my view) a more nicely designed plastic model. 

The second contribution to the Challenge last week is a US  M3 halftrack, the real workhorse of the Allied mechanized units in Europe (including several thousands supplied to the Soviet Union).


A solid and reliable APC, it saw action in Asia, Middle East and Latin America well into the 80s. It was also the main APC vehicle of the Spanish army, until being replaced by the M113 in the early 80s. Actually, you can see it featuring both on the Allied and  Axis sides in classical war movies films like Patton or the Battle of the Ardennes, filmed both in Spain with the support of our army.

This kit was acquired assembled second hand to one of my local club friends, and I'm unsure whether it is a Rubicon or a Warlord model. 

These two vehicles plus an extra bonus earned in one the Challenge Library rooms themes, added 60 points to muy personal scoring. I'm now at 200 points accumulated, or 50% of my 400 points target for the year.


Saturday 27 January 2024

Painting Challenge Report #2

This is long overdue post, as the original entry published in the Painting Challenge blog was dated January 7th 2024. My second contribution to the Challenge this year is a unit of Late Roman mounted light archers.


The unit is part of the project that slowly is taking shape to have an 8 points Saga Late Roman warband: more cavalry will arrive soon and I have the Heavy Cavakry and Light Infantry boxes already at home. 


The models are part of the multi-pose Gripping Beast plastic range (Late Roman Light Cavalry) offering two different options (armed with bows or with javelins). These are vey well designed minis and the box offer (in my humble opinion) one of the best quality for price combos in the market.   


The unit together with some bonus points add 100 points to my Challenge score, to a total of 140 points. I'm now at 35% of my Challenge target of 400 points by March 31st, and I'm confident that will reach the target on time with the pipeline of models currently sitting on my desk.

Sunday 7 January 2024

The Last Hundred Yards Reviewed: The Ultimate WWII Tactical Game

The Last Hundred Yards (LHY) is a series of tactical board wargames in a Second World War environment designed by Mike Denson and published by GMT Games. The LHY system has recently  become my number #1 tactical game of choice in detriment of Advanced Squad Leader (ASL). The LHY cover small mostly infantry-based skirmish actions at company/platoon level, with an innovative sequence of play resulting in fun, fast paced and furious engagements.

The terrain scale is 1 hex = 50 yards and the time-scale is variable, each "turn" or combat cycle representing between  2 and 5 minutes. Counters represents squads and sections (half squads), platoon leaders, support weapons (HMG/MMG, flamethrowers or light antitank weapons squads) and individual vehicles. 

Additionally there's a myriad of auxiliary counters to keep a record of activated units, fire effects (more on this later), heroic units, etc  as well as other counters representing minefields, foxholes, smoke of fortified positions among others.

The quality of production is high as usual in GMT: units counters are large  9/16 of an inch squares (3/4 of an inch for auxiliary counters) and maps are very nicely printed giving a sense of "3d" depth; the maps are generic geomorphic, double sided printed and can be arranged in almost infinite combinations. 

When compared to ASL, there are a few aspects that are worth taking into consideration:

The first is the length and complexity of rules: you got everything you need to play in a 34-pages long publication (the current rules book version 3.1). There's also a complementary "playbook" with extended illustrated examples of play of the different rules sections. And the scenarios (or "Missions" in LHY parlance) can include some (very few) special rules applicable to that particular situation. 

Second, the game is played using the historical orders of battle. The forces are organised in companies of three platoons, each led by a platoon commander and depicting three squads and potentially some support weapons. You can argue that these were "paper-strength" orbats; but missions (based on historical real engagements) take into consideration the real manpower of the units involved, adjusting the forces accordingly.

Third you play against the clock and the casualties. Missions may set some objectives, but you must accomplish the mission in a fixed timeframe (and time passed is variable in each turn) and not incurring excessive casualties. Unlike ASL for example, where you can win a scenario even with only one suqad left on the table, in LHY the depletion of your manpower counts against you. 

Finally, the very innovative game system based on an action/reaction chain of the players' units, reflecting the combat friction typically found in the battlefield.


Overview of the Playing System

How the system works? The sequence of play is structured in 7 phases or steps. 

Phase 1 (initiative) is to determine initiative rolling a dice and winning the side with the higher outcome. Note however that there is no full randomness. Usually the attacking side owns the initiative at the start and will have a positive DRM to the die roll in subsequent turns. 

Once initiative is resolved we entre into Phase 2 (activation), the nitty-gritty  of the system, based on an action-reaction chain. Activation is made by company and then by platoon within a company. Two platoons of the same active company  may coordinate actions with a die roll, but usually you go platoon by platoon  (To clarify: as the attacker, I declare that Able will be my active company; from there I activate platoon by platoon).

The selected platoon may undertake different possible actions: move, fire, withdraw, assault, call for mortars, recover from disruption or just stay put. Once the player declares the end of its platoon activations, the opposing player can react with the units that saw an action (i.e.: in LOS of an activated enemy undertaking an action). When the opposing player declares the end of the reaction, the player with the initiative may react to the enemy reactions or else conclude that platoon activation and activate a second platoon. Reactions do not need to be just shooting someone getting into LOS, but players can move units to get a position of advantage or to avoid being assaulted.

As you see the system creates a cascade of action/reaction moves. Interesting, shooting is not resolved automatically in this phase; therefore you decide your actions/reaction without any knowledge of what effect shooting had on the enemy unit. This adds another layer of friction to the game.

Introducing shooting, the system rewards proximity to the target which basically implies that little harm is made when shooting at three hexes or more. Fire effect is calculated as a "dice roll modifier" ranging from -4 to +3. The base number is the firepower of the unit shooting and the distance to the target, then adjusted by a list of modifiers (cover, hindrances, concealment, density of manpower in the target hex...) to get the final fire modifier.  

One example to illustrate the mechanics. 

  • A German rifle squad with a firepower of 1 and fire range of 10 hexes, shots at a US squad in a forest at 4 hexes distance. 
  • Crossing range (10) with the distance (4) in the Small Arms Fire Table, the German squad will have a base number of 0 (+1 for firepower less -1 modifier for distance).
  •  As the target unit is under cover of some woods, there's an additional -1 penalty to the shot, resulting a total fire modifier on -1 

 Note: should the Germans have fired at 3 hexes or closer, the modifier for distance for a 10 fire range squad would have been 0 and therefore the final fire modifier  would have been 0: +1 fire power + 0 distance modifier -1 for woods).

At this stage of phase 2, the target unit under fire will be marked with a "-1" Small Arms Fire Die Roll Modifier (SADRM) counter, but the actual effect of the fire will not be resolved yet. 

Once the active player concluded activating all the platoons and both players finished their respective reactions,  the play sequence moves to Phase 3 of Fire Resolution. As explained, the units under fire are marked in Phase 2 with the SADRM modifier. Firer rolls a 10-sided die, adds the modifier and compares the final result to the unit cohesion level: if lower, no effect; greater, the unit disrupts; if 10 or higher, the units suffers a casualty.

Assaults resolution is done in Phase 4 (after firing). Like shooting, assaults take place in Phase 2 as part of the units activations, but the effect of the melee is unknown until later in the sequence of play.

Phase 5 relates to mortars: now it's the time to extend fire missions called in the current turn; or to attempt  contacting the battery for the following turn. 

In Phase 6 (Time Lapse)  the active player rolls for time spent in the turn, which is variable between 2 and 5 minutes

And the final Phase 7 is a clean up phase in which players remove different game markers, the smoke counters placed in Phase 2, or place conceal markers on units out of LOS, etc

This is a nutshell how the system works, being very unique and distinctive compared to other tactical systems in the market. The rules book of course have many other chapters dealing with vehicles, anti-tank fire, airborne troops, special national characteristics (applicable to Russian and Japanese units), night fights, etc. 

If I have to summarise the game, the system rewards the player gaining and keeping the initiative. Having the initiative is in fact a key driver to win a game: as an attacker, getting the initiative allows great flexibility of action, with the defender only able react to your moves. If on the contrary, the defender gets the initiative, he'd be able to slow down the attacker, only having to decide how much time for space he's willing to trade.

Current product line and future releases

The LHY series currently has four game boxes (or "volumes") and one "mission pack" (set of scenarios)

Volume 1 ("The Last Hundred Yards") covered the US and the German army in the European Western Front during 1944 and 1945

Volume 2 ("Airborne Over Europe") introduced US and German paratroop units as well as British armour units (representing the XXX Corps assets for the US side Market Garden) 

Volume 3 ("The Solomon Islands") introduced the Japanese Imperial Army and the US Marines in Guadalcanal.

Volume 4 ("The Russian Front") very recently released (December 2023) covers the Eastern Front battles confronting the Red Army and the Germans between 1943 and 1945.

Mission Pack 1 provides some new maps and mission cards to play in the European Western Front.

In relation to future releases, the only confirmed addition to the series will be Volume 5 ("For King & Country"), introducing the British Forces in Western Europe during 1944 (Normandy and Market Garden). Vol 5 is currently in GMT's P500 page and likely to be released in late 2024

In a recent thread in BGG, Mike Denson announced he's taking a step back after the release of Volume 5  but will leave a committed and experienced team in place to ensure continuity of the system. After Vol 5 the team seems inclined to return to the Eastern Front battles but focused on the earlier war period (1941-43); no official release date yet, but sometime in 2025 likely.    

Convinced to jump-in? Some important considerations

So you have been convinced and want to play LHY? You must then consider the following:

Vol 1 and Vol 2 are core acquisitions that you need to have. These are needed to play the Russian Front volume, the Mission pack and the future British volume. 

Volume 3 (The Solomons) on the other hand, is a self-contained game; if your focus in the Pacific, don't need to buy the rest of the boxes. 

The designer is continuously updating the rules and support materials (playbook, tables)  with the the introduction of new armies and suggestions from players across the world. For that reason,  all the booklets and support tables coming in the different game boxes are outdated.

The GMT website posts the most recent versions of the rules, tables, etc. Check regularly for new version, to uploading and eventually printing. The latest version of the rules (as I'm writing this) is 3.1 The changes versus version 3.0 (included in the latest Russian Front game) are minimal but I suggest checking v 3.1and marking the amended paragraphs in the 3.0 printed booklet.

This also applies to the missions or scenarios: GMT has released last December the amended missions in downloadable pdf format for all the different volumes (including Russian Front!.. I wonder who is in charge of quality control at the firm). There's lots of small but nonetheless significant, changes that you should be aware of before playing any mission. 

Finally, if you haven't done it yet I strongly advise to sign in to the LHY's BGG website page. There you'll find a very active and supportive community of players, with tons of reviews, videos and other downloadable materials. My experience requesting clarifications and questions couldn't have been better indeed. Designer Mike Denson is also quite active in the forums.  


GBoH and LHY - Two of my favourite rules systems


Saturday 6 January 2024

Painting Challenge report #1

A late start this year in the Annual Painting Challenge, Christmas holidays have been particularly busy with different family and friends gatherings.  In any case, my first post is already live (published on December 31st) and will eventually be the initial  part of a series dedicated to 2WW recce vehicles.


This is a German "Luchs" (or Lynx in Englsih) an evolution of the Panzer II that saw action from mid '43 in the recon units of the German divisions both in the Eastern and Western front. The production was limited to a total of 100 units (according to Wikipedia), which made sense cutting when Germany went into a defensive stance and shifter efforts to the large "cats".


This is a resin 3D printed model from the French company Eskice; this model in particular has a good design but the truth is that the brand is pretty irregular in the quality of their designs (the German Fallschirmjager for example are terrible) 

It was painted in a 2-colour (dark yellow + green) cammo scheme with a faded touch.


The model scored for the "New Acquisitions" section of this year's Challenge bonus pool (developed around the sections of a Public Library) and merited a total of 40 points (or 10% of my 400 points Challenge target in 2024).

Have a great 2024! 

Sunday 11 June 2023

Kampfgruppe Von Luck #4 - Scenario 3: Attacking the Corridor of Death

Time: early hours of June 6th, 1944

Location: La Bas de Ranville, British main position

This is an attack-defend scenario in the main British defensive position. At least in theory, each house may become a strong point and the Germans have to clear it out paying a high price in blood

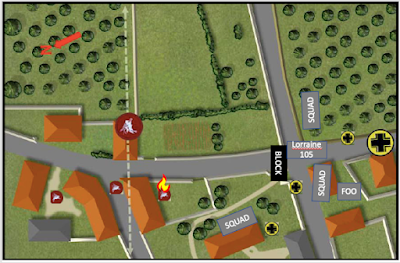
The British decided to deploy a new fresh platoon and the Germans played with the platoon used in Scenario 1, with only 1 man missing at this stage. The Germans also have 19 support points which were used to reinforce the kampfgruppe with an additional squad and bring an artillery forward observer and a self-propelled 105cm gun (Lorraine Schelepper)

The British spent their support points in one 6 pounder AT gun and roadblock.


After the patrol phase (see jumpoff points in map above), the Germans went for a quick deploy in 3 phases, bringing three squads, the SPG and the FOO in short order. The British roadblock forced the SPG to stop at the first crossroads and stay in overwatch in case a British unit emerged, while the FOO initiated a pre-emptive bombardment in the area marked with a flame.

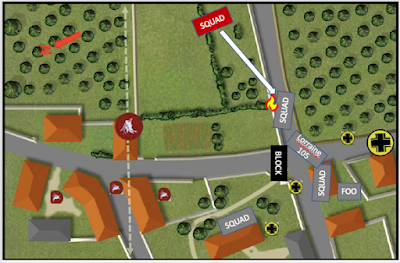
The game first few phases saw both opponents taking a conservative approach: all German units in overwatch while no British units showing on the field. At a point, the British rolled three 6s and took the opportunity to lift the German artillery barrage, and to deploy an infantry squad and fire on the Germans next to the orchard during two consecutive phases, alas with very little effect (just one shock).

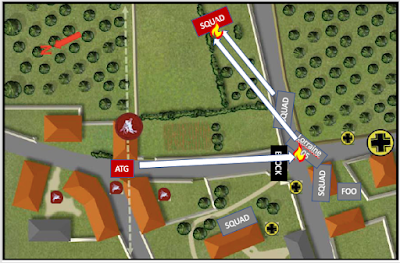
The German reacting reforming the squad and and the SPG (13 HE capability) to return fire on the reckless British, killing 5 men in total. 

The British saw the opportunity in turn now to fire at the SPG by the flank, deploying the 6 pounder on the main road of Ranville. But luck was not on the British side and failed to hit the behemoth. The SPG now turn left and fired, wiping out the ATG crew and gun in one salvo. The British player saw no point in continue fighting and called a retreat.  

Three victories to the Germans so far. This scenario was supposed to be a bloodbath for the German but it was otherwise. The Germans need to win another two scenarios in five possible games. The three German platoons are in very good shape, while the British are by now scrapping the bottom of the barrel. In my opinion, very challenging for the British to win the campaign in these current conditions.      

--UPDATE  JUNE 21 --

The Allied player reassessed the situation and concluded that he had no real opportunity to turnaround the game and conceded defeat. The campaign is concluded with a decisive German victory


- Photo Report -


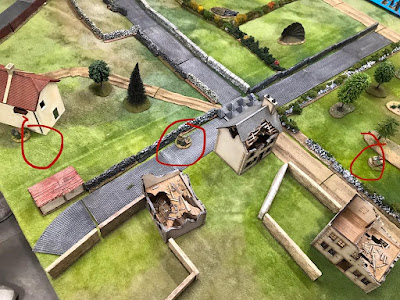
British Jumpoff Points

German Jumpoff Points

German deployment #1


German deployment #2


German SP Gun


British Airborne Squad


British 6 Pounder

British 6 Pounder

Monday 22 May 2023

What a Cowboy! A First Take

 Never say never... when Too Fat Lardies announced the publication of a new set of rules to play with cowboys, my inner historical wargamer soul said: "Bah! No interest... won't play this".... famous last words.

Piqued by the exchange of messages in the club's Telegram group, the nice photos shared there and the (pushing) siren voice of my club pal Miguel, the Club Dragon What a Cowboy leader, I finally surrendered and gave it a try... and ... oh boy! What a fun time I had so far!. 

As said, I'm a deeply rooted historical gamer (both board and tabletop); but my recent foray into the War of The Ring showed that there's life (and fun) outside the pure historical simulation universe. 

What follows is a brief summary and my personal take on the rules after a couple of games (note: I don't have the printed copy, only the electronic PDF version).

The rules were designed and written by John Savage, an active and long standing member of the Lard fans club. I´ve seen posts testing the rules in social media for years, so I had no doubt the final product was going to be solid as a rock.

The book is a lavishly illustrated, impressive 86 pages tome, covering the main rules mechanics, a guide to create characters and recruit a gang, and finally the campaign system.

I have only played so far with the basic set of rules, but has been enough not only to enjoy a couple of hours rolling dice on a table but also to understand the full potential of the game.

What a Cowboy is a very cinematic set of rules where you at best are going to play with a couple of main characters and may be three secondary actors known as henchmen. So forget about playing serious and professionally as you do with your historical rule sets; and no, you won't have to paint a lot of minis to start playing.

The system is loosely based in the What a Tanker system, but adapted to the the features of the North American frontier lands in the mid-19th century. 

Your character can have a certain level (ranging from "greenhorn" to "legend"); he will usually have a Colt or a Winchester (in the more advance rules you can choose from a wide range of weaponry); and he may also have some special skill.

You have initially 6 action dice. Each score (1 to 6) allows the characters to move (1),  spot (2),  aim (3), or fire/reload your weapon (4-5). 

The 6 can be used as a joker to undertake any of the other actions (so for example,  you can move with 1 and 6; or fire/reload your weapon with 4-5 and 6); recover shocks; or attempt some adventorous (I'll say "crazy" action), like for example rolling on the floor while shooting at your opponent.

In addition you may have one or more "Bonanza Tokens", that allow the character to opportunistically react to an enemy action. And there's also a special card deck (the "Desperado Deck") that you can distribute among all playing characters, enabling some one-off actions (can be downloaded for free)

The game is based on card driven activations: each character is represented and activated by a card of a standard card deck. When a character shots (or is shot by) other character, you have different factors to take into consideration including whether the shot is aimed, distance to target, cover benefitting the target, type of weapon used, etc. 

Characters can react to shootings (equivalent to "saving throws") trying to avoid the bullet by hitting the dirt or taking cover nearby. If failing dodging the bullet, the character receives an impact that can range from being a simple shock to a critical wound.

And that's basically it. You have of course typical (and sensible) rules covering LOS, levels of cover when being shot, riding horses, etc.

The fun part of the game is using you dice results to make all sorts of actions usually seen in cowboy movies: jump from balcony to ride a horse, assault a train or stage coach by jumping from your horse, crash the Saloon's glass window and come up shooting your gun... you choose.

For my first two games  I received two characters (a greenhorn and a gunslinger) given that the average life of a new playeer in the game was 5 to 8 turns at best. 

These were the infamous and fearsome Lardo Brothers, Nicolas and Ricardo.  Both were killed in record time in my first game, so soon I learnt that bravado brings suffering, and it's best to move and to approach your enemies using the best possible cover on the table (from fences or barrels, to wagons or even the wood pisoir cabin on the back of a house XD.

Future plans include elaborating  more  detailed characters with a background story, riding horses and potentially starting a campaign next Autumn.

As said, to play What a Cowboy you need not to invest a lot in minis (although once you have a couple of typical cowboy characters, you want also the sheriff and the deputy, the gambler, the Mexicans or the red skins just in case).

Scenery on the other hand is money well spent, and once you have a few tytpical houses (saloon, hotel, jail, etc) you start collecting like mad all type of things: drinking troughs, fences and rails, a graveyard, ... a train!! The visual impact is key ingredient in enjoying the games.

In summary: a fantastic, fun, fast and simple set of rules. From a historical wargamer to anotehr historical wargamer: forget formations, tactics and combined arms... unleash your imagination and return to your childhood cowboy and indians games payed with your pals. 

And of course, search in your TV streaming provider all those John Wayne films to get inspiration for your games.


Hope this short review entices many of you to give a try to What a Cowboy.