Pages

Wednesday, 31 March 2010

Arras game - Preparing the next test


I'm about to leave for a few days of holidays and will be off-line until mid next week, but will be taking with me reading materials and a handy copy of Stouts Hearts (http://toofatlardies.co.uk/index.php?main_page=product_info&cPath=5&products_id=17). Before leaving, some thoughts on the Arras scenario and potential lines of improvement.

Analysing the outcome of the first test, I conclude that there are two major flaws in the design that unbalance the scenario on the British side: they have overwhelming firepower and no time constraints.

On the basis of these two factors, they can take whatever time is necessary to deploy their troops and make use of that fire power almost at leisure on the German forces. In order to rebalance the scenario I’m planning to introduce two changes to the scenario conditions.
Saturday, 27 March 2010

Arras game - Battle report (first test)


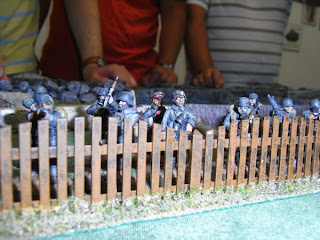
A few days ago we made a first test of the scenario. Some can argue that the result was accurately historical, with the Germans literally wiped-out from the table.

Being myself on the German side, the following comments may look biased, but the reality is that (independently of some serious mistakes in the way we deployed), I found the game generally unbalanced against the Germans (more later on this).

Let's start by describing the deployment of both sides and the battle development.

German deployment
Facing overwhelming artillery superiority, we decided to put three squads (including the granatenwerfer section) in the second line, while the remaining squad (bombers) in the reserve area, scheduling to enter after the 5th “time for snifter” (the squad will activate on the German blind card of the sixth turn).

Our hope was that the British player would concentrate most of its artillery fire in the first line; thus starting slightly to the rear of the position would result in lighter casualties than trying to hold the first line.

Friday, 19 March 2010

Outlining an Arras game


We are currently working a scenario based on the fighting south of Arras, as described in the previous entry. Key aspects follow.

British objectives and forces
The British player's objective is twofold:
  • To control the German trench line,
  • and to exit behind the German lines with at least a platoon.
The British player has two full platoons each of four sections + HQ, organised as follows:

A. Platoon 1 (big men status in brackets) - Assault force (Veteran/Good/Aggressive)
  • HQ section: Lt (IV), Sgt (II), 2 scouts/runners
  • Bombers: 6 bombers, 2 rifles, 1 corporal (I)
  • Rifle: 6 rifles, 2 bombers, 1 corporal (I)
  • Rifle grenadiers: 4 teams @ 2 crew each, 1 corporal (I)
  • LMG section: 1 LMG, 1 loader, 6 rifles, 1 corporal (I)
B. Platoon 2 (big men status in brackets) - Mop up force (Regular/Good/Aggressive)
  • HQ Section: Lt (III), Sgt (II), 2 scouts/runners
  • Bombers: 6 bombers, 2 trench cleaners, 1 corporal (I)
  • Rifle: 5 rifles, 2 bombers, 1 trench cleaner, 1 corporal (I)
  • Rifle grenadiers: 4 teams @ 2 crew each, 1 corporal (I)
  • LMG section: 1 LMG, 1 loader, 6 rifles, 1 corporal (I)
C. Support HMG: (Regular/good)
  • HMG @ 5 crew

Tuesday, 16 March 2010

Arras 1917

I find the campaign around Arras in April 1917 as a very attractive and challenging period of I WW for gamers.

Historical background
By the end of 1916, the Allied armies had taken the strategic initiative in the Western Front, thanks to a gradual build up of new divisions, an increasing number of mid & heavy artillery pieces and well replenished ammunition stocks.

Also very significant, the hard lessons learned by the British Army during the Somme campaign in 1916 brought significant changes to the tactical performance and organisation of its forces, with a shift of emphasis on the platoon as the main infantry fighting sub-unit. The British platoon of 1917 was organised around four sections or teams (riflemen, bombers, rifle-grenadiers and a light machine-gun section) with an HQ section including the senior leader (usually a lieutenant), a sergeant and two scouts/runners.

Different arms coordination was also improved, and more specifically infantry-artillery combined operations. Arras saw the introduction of the “creeping barrage” concept, a moving curtain of sustained artillery fire preceding the advancing lines of British infantry when approaching the enemy’s positions.

Sunday, 14 March 2010

Introduction

Here we go... I plan to maintain this blog to share ideas, scenarios and battle reports of my games with the Twofatlardies rule sets (http://toofatlardies.co.uk/). We'll see if this works and I'm up to the challenge, taking into consideration my family and profesional obligations...on top of struggling to reduce my "lead & plastic" figures painting pile, etc.

A bit of background: I become a follower of the Lardies in late 2008, when someone in my local club persuaded a group of us to test the skirmish-oriented I World War set called "Through the Mud and Blood" (TMB); I think we inmediately fell in love with these rules and from there it took very little effort to jump into "Troops Weapons and Tactics" (TWT), the Lardies' II World War rule set, that have been extensively tried over the last year.

What I most like from the Lardies' rule sets is the combination of playability (... not suited to the Squad Leader fans...), real historical flavour and the very original game-engine design based on cards versus the traditional "I go-you go" turn sequence, which brings a strong "fog of war" sense into the game table.

I can only conclude recommending to give a try to these two sets or to any of the remaining rule sets dealing with modern (Vietnam about to be published) and napoleonic conflicts, or the recently released II WW aerial combat set "Bag the Hun".