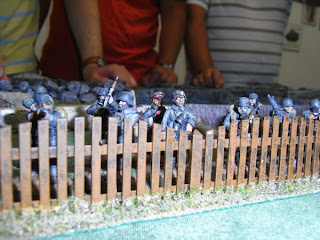
A few days ago we made a first test of the scenario. Some can argue that the result was accurately historical, with the Germans literally wiped-out from the table.
Being myself on the German side, the following comments may look biased, but the reality is that (independently of some serious mistakes in the way we deployed), I found the game generally unbalanced against the Germans (more later on this).
Let's start by describing the deployment of both sides and the battle development.
German deployment
Facing overwhelming artillery superiority, we decided to put three squads (including the granatenwerfer section) in the second line, while the remaining squad (bombers) in the reserve area, scheduling to enter after the 5th “time for snifter” (the squad will activate on the German blind card of the sixth turn).
Our hope was that the British player would concentrate most of its artillery fire in the first line; thus starting slightly to the rear of the position would result in lighter casualties than trying to hold the first line.
We concentrated the forces in the right flank of our position and placed the bunker with the HMG and the HQ sections on the left, both to cover any potential infiltration of British forces and to channel their forces on the opposite end.
British deployment
The British player had to plot its artillery bombardment program before the German player deployed its blinds. He decided was to spend 1 turn on the wire, 4 turns on the first trench line, 2 on the third and the remaining in the rearguard area.
As the bunker was on its right flank and he (rightly) guessed that some nasty HMG was probably occupying the position, he decided to concentrate his forces in the left flank.

Battle development
The British made a quick and basically unopposed advance until the wire line, the Germans unable to make any spot attempt as the artillery barrage blinded their line of sight.
The British player tested the wire status once it was reached; a relatively low die throw plus the fact that it was only 1 turn under artillery fire translated into a solid "status 3" which meant that had a -3 inches penalty per movement dice (...in fact the result was a "status 4" or impassable, but the German conceded to reduce it to status 3 in order to let the game continue).
The effect of the artillery fire on the German forces was relatively light thanks to having moved to the second line and receiving just 2 turns of fire. Only 1 of the three section in the trench went to the dugouts and the number of casualties was low (2 in total) although 1 of the sections accumulated a relatively high number of suppressions.
In the meantime several British squads crossed the wire and reached the first trench line thanks to stream of blind activations.
With the artillery barrage concluded, it was time deploy squads out of blinds, as now most the forces of both sides were in or next to automatic spotting distance. In that moment the German player realise two major mistakes of its deployment:
- The HMG was totally inoperative as the British forces were by now out of its arc of fire (45º to the fornt of the bunker).
- And the remaining German squads were now facing the terrible fire power of two full British squads and the HMG (that was also moved to the first trench line!) at short distance.
A decisive victory to the British and a bloody defeat to the Germans.

I'm not familiar with the WWI rules, so I had a couple of questions after reading this report.
ReplyDelete1) When the wire result was impassable, does the British player have some means other than artillery of downgrading that wire? Can he cut through by hand, etc?
If there *is* provision for cutting the wire, etc, then it would seem that allowing them to downgrade from impassable to a -3 may have allowed them to avoid possibly several turns spent exposed while cutting wire, during which your Germans might have made their spot roll. Or at the very least, managed to redeploy to the front lines as desired.
2) Given the dominance a machine gun could have on that battlefield, bad deployment of your main source of firepower may have been more at fault than poor scenario balance. If your MG had been able to engage them the firepower balance might have been much different?
1/ We agreed that in that case the British player had to move sideways and attempt spotting again ion a different wire section.
ReplyDelete2/ Totally agree with this! And actually in the second test the MMG properly deployed showed to be more than effective