Probably spurred by all the noise around Armistice Day yesterday, we played last night a WWI game with the TooFatLardies battalion level rules If the Lord Spares Us. Although these were initially designed to play Middle East actions, a Western Front adaptation was published in the Summer 2011 Special called "Storm of Dice".
This has been my first experience with this set of rules. Released in 2005, they maintain a good quality level but I have to admitt that look a little bit outdated compared to the most recent products of th TFL factory like the WW II period I Ain't Been Shot Mum or the Vietnam era Charlie Don't Surf. Having said that, they make a very good and relatively short game, for example in a late Friday afternoon.
The game consisted in a 6' x 4' size table, showing a German defensive position with three trench lines and barbed wire at the edge of a wood...
British recon aircraft flying over the battlefield
Two British battalions, supported by a HMG unit and led by a Division Commander, had to assault and to control the first and second lines in 10 turns. The British also needed to plot in advance an artillery barrage plan, to be distributed along the table: we decided to fire the wire during 3 turns, the first trench line another 3 turns and move to the second trench line the final 4 turns. Both British battalions were giving "attack" orders.
German initial display in blinds
The German displayed in blinds except a battalion commander and the signaller base (note: these are used by the main force commander to activate units or to change orders), all in the first trench line.
Given that this was our first contact with the rules, the game suffer from our lack of familiarity with the game mechanics (I warn to other players, these are quite different to other TFL rules sets), with frequent breaks to re-read entire book sections as doubts and questions emerged.
Despite that, the game flowed nicely. The artillery fire effectively destroyed the barbed wire on the right side of the British line, and the British units channelled their attack through that flank, advancing under the cover of the woods.
God's (umpire) finger pointing to a British company
The edge of the woods was the springboard for the assault of the first British battalion, who initiated the attack once the artillery barrier lifted and moved to the second. The control of this first line was heavily contested until the end of the game, with the Germans regrouping and counterattacking very much in the tradition of the WWI German army doctrine.
General view of the British attack
British HMG providing fire support
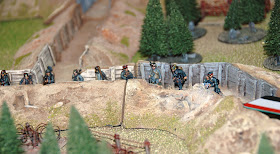
Germans ready to repel assault
Trench assault close up
The fight for the trenches
Germans don't give up and counterattack
A second (Scottish) battalion followed with one company moving ahead to take control of the second trench line (a key victory objective)
Scottish attacking to the sound of the pipes
After the 9th tea break card, the Socttish battlion was activated and the most forward company successfully attacked the German unit defending the second trench, claiming control of the position.... butm alas, only to receive the full blast of the last British artillery turn (scheduled to fall into the second trench line until the 10th trun). The brave Jocks received several kills and the company was dispersed, loosing posession of the trench so hardly fought.
And that was it. In a couple of hours we played a very fun and dynamic game, with continous changes of fortune on both sides. As I said, these are not the best-written rules of the TFL factory, but good enough to simulate high-level formation battles (Brigade-sized and even Division), with an important focus on commnad and commanders rather than the pure arms fire exchange.
Lessons learned in this first game:
- Need to plan better artillery barrages (we left half of the barbed wire line untouched)
- Better use of commanders (they are the KEY for victory with thes rules): we completely forgot to put in play the Brigade commander, that could have helped to reduce the level of supressions suffered by our units when the key assaults took place.
- And finally, never-ever allow your artillery to fire the main objective until the last turn (a lessons well learned by the Scottish unit, that saw victory vanishing literally in the last move of the last turn of the game).
Epilogue: Canvas eagles fighting to control the sky


Great report. I really liked the photos.
ReplyDeleteNice game report. I have this set of rules also and after reading them I felt they needed an update badly. I may just shelve these for awhile.
ReplyDelete@Victor: truly TFL latest products are well beyond ITLSU in quality but if you fancy a high level organisation game to be played in 2-3 hours, they still give a good service
ReplyDeleteGreat report, Benito. And fantastic terrain, figures and aircraft. I really like the Scottish battaliion! I think there's an intention that ITLSU will get updated someday by Nick, and that there'll be a companion ruleset from TooFatLardies focusing on the Western Front (following the Boer War rules) ... but don't quote me on that!
ReplyDeleteImpresionante... qué pasada de... todo.
ReplyDeleteUna pregunta, tú que controlas: ¿qué opinas acerca de usar el ITLSU para la guerra de Cuba?¿Y para la guerra Ruso-Japonesa?
@emilio: no conozco bien los periodos pero yo preguntaría en el Grupo Yahoo
ReplyDeleteYa lo hice hace un par de meses. La respuesta fué que probablemente la futura versión para la guerra Boer sea más apropiada... pero todavía no se ha publicado.
ReplyDelete