Sunday 11 June 2023

Kampfgruppe Von Luck #4 - Scenario 3: Attacking the Corridor of Death

Time: early hours of June 6th, 1944

Location: La Bas de Ranville, British main position

This is an attack-defend scenario in the main British defensive position. At least in theory, each house may become a strong point and the Germans have to clear it out paying a high price in blood

The British decided to deploy a new fresh platoon and the Germans played with the platoon used in Scenario 1, with only 1 man missing at this stage. The Germans also have 19 support points which were used to reinforce the kampfgruppe with an additional squad and bring an artillery forward observer and a self-propelled 105cm gun (Lorraine Schelepper)

The British spent their support points in one 6 pounder AT gun and roadblock.


After the patrol phase (see jumpoff points in map above), the Germans went for a quick deploy in 3 phases, bringing three squads, the SPG and the FOO in short order. The British roadblock forced the SPG to stop at the first crossroads and stay in overwatch in case a British unit emerged, while the FOO initiated a pre-emptive bombardment in the area marked with a flame.

The game first few phases saw both opponents taking a conservative approach: all German units in overwatch while no British units showing on the field. At a point, the British rolled three 6s and took the opportunity to lift the German artillery barrage, and to deploy an infantry squad and fire on the Germans next to the orchard during two consecutive phases, alas with very little effect (just one shock).

The German reacting reforming the squad and and the SPG (13 HE capability) to return fire on the reckless British, killing 5 men in total. 

The British saw the opportunity in turn now to fire at the SPG by the flank, deploying the 6 pounder on the main road of Ranville. But luck was not on the British side and failed to hit the behemoth. The SPG now turn left and fired, wiping out the ATG crew and gun in one salvo. The British player saw no point in continue fighting and called a retreat.  

Three victories to the Germans so far. This scenario was supposed to be a bloodbath for the German but it was otherwise. The Germans need to win another two scenarios in five possible games. The three German platoons are in very good shape, while the British are by now scrapping the bottom of the barrel. In my opinion, very challenging for the British to win the campaign in these current conditions.      

--UPDATE  JUNE 21 --

The Allied player reassessed the situation and concluded that he had no real opportunity to turnaround the game and conceded defeat. The campaign is concluded with a decisive German victory


- Photo Report -


British Jumpoff Points

German Jumpoff Points

German deployment #1


German deployment #2


German SP Gun


British Airborne Squad


British 6 Pounder

British 6 Pounder

Monday 22 May 2023

What a Cowboy! A First Take

 Never say never... when Too Fat Lardies announced the publication of a new set of rules to play with cowboys, my inner historical wargamer soul said: "Bah! No interest... won't play this".... famous last words.

Piqued by the exchange of messages in the club's Telegram group, the nice photos shared there and the (pushing) siren voice of my club pal Miguel, the Club Dragon What a Cowboy leader, I finally surrendered and gave it a try... and ... oh boy! What a fun time I had so far!. 

As said, I'm a deeply rooted historical gamer (both board and tabletop); but my recent foray into the War of The Ring showed that there's life (and fun) outside the pure historical simulation universe. 

What follows is a brief summary and my personal take on the rules after a couple of games (note: I don't have the printed copy, only the electronic PDF version).

The rules were designed and written by John Savage, an active and long standing member of the Lard fans club. I´ve seen posts testing the rules in social media for years, so I had no doubt the final product was going to be solid as a rock.

The book is a lavishly illustrated, impressive 86 pages tome, covering the main rules mechanics, a guide to create characters and recruit a gang, and finally the campaign system.

I have only played so far with the basic set of rules, but has been enough not only to enjoy a couple of hours rolling dice on a table but also to understand the full potential of the game.

What a Cowboy is a very cinematic set of rules where you at best are going to play with a couple of main characters and may be three secondary actors known as henchmen. So forget about playing serious and professionally as you do with your historical rule sets; and no, you won't have to paint a lot of minis to start playing.

The system is loosely based in the What a Tanker system, but adapted to the the features of the North American frontier lands in the mid-19th century. 

Your character can have a certain level (ranging from "greenhorn" to "legend"); he will usually have a Colt or a Winchester (in the more advance rules you can choose from a wide range of weaponry); and he may also have some special skill.

You have initially 6 action dice. Each score (1 to 6) allows the characters to move (1),  spot (2),  aim (3), or fire/reload your weapon (4-5). 

The 6 can be used as a joker to undertake any of the other actions (so for example,  you can move with 1 and 6; or fire/reload your weapon with 4-5 and 6); recover shocks; or attempt some adventorous (I'll say "crazy" action), like for example rolling on the floor while shooting at your opponent.

In addition you may have one or more "Bonanza Tokens", that allow the character to opportunistically react to an enemy action. And there's also a special card deck (the "Desperado Deck") that you can distribute among all playing characters, enabling some one-off actions (can be downloaded for free)

The game is based on card driven activations: each character is represented and activated by a card of a standard card deck. When a character shots (or is shot by) other character, you have different factors to take into consideration including whether the shot is aimed, distance to target, cover benefitting the target, type of weapon used, etc. 

Characters can react to shootings (equivalent to "saving throws") trying to avoid the bullet by hitting the dirt or taking cover nearby. If failing dodging the bullet, the character receives an impact that can range from being a simple shock to a critical wound.

And that's basically it. You have of course typical (and sensible) rules covering LOS, levels of cover when being shot, riding horses, etc.

The fun part of the game is using you dice results to make all sorts of actions usually seen in cowboy movies: jump from balcony to ride a horse, assault a train or stage coach by jumping from your horse, crash the Saloon's glass window and come up shooting your gun... you choose.

For my first two games  I received two characters (a greenhorn and a gunslinger) given that the average life of a new playeer in the game was 5 to 8 turns at best. 

These were the infamous and fearsome Lardo Brothers, Nicolas and Ricardo.  Both were killed in record time in my first game, so soon I learnt that bravado brings suffering, and it's best to move and to approach your enemies using the best possible cover on the table (from fences or barrels, to wagons or even the wood pisoir cabin on the back of a house XD.

Future plans include elaborating  more  detailed characters with a background story, riding horses and potentially starting a campaign next Autumn.

As said, to play What a Cowboy you need not to invest a lot in minis (although once you have a couple of typical cowboy characters, you want also the sheriff and the deputy, the gambler, the Mexicans or the red skins just in case).

Scenery on the other hand is money well spent, and once you have a few tytpical houses (saloon, hotel, jail, etc) you start collecting like mad all type of things: drinking troughs, fences and rails, a graveyard, ... a train!! The visual impact is key ingredient in enjoying the games.

In summary: a fantastic, fun, fast and simple set of rules. From a historical wargamer to anotehr historical wargamer: forget formations, tactics and combined arms... unleash your imagination and return to your childhood cowboy and indians games payed with your pals. 

And of course, search in your TV streaming provider all those John Wayne films to get inspiration for your games.


Hope this short review entices many of you to give a try to What a Cowboy.


Sunday 21 May 2023

Kampfgruppe Von Luck #3 - Scenario 2: Probe Among the Hedgerows

 Time: early hours of June 6th, 1944

Location: British forward positions on the southern outskirts of Le Bas de Ranville

Having pulled back form the outer outposts, the British platoon stops to hold the enemy in the outskirts of La Bas Ranville. In Chain of Command terms this is a "Scenario 2 - Probe" game.

The British forces are the remnants of the decimated platoon that played Scenario 1. Bad dice rolls and none of the scattered platoon teams after the drop appeared. The British had 4 support points invested in an HMG.

For this scenario the German has a new fresh platoon plus 13 support points. These were invested in a second senior leader, a Forward Observer team and a Lorraine Schlepper self propelled 150 mm gun. 

To win the scenario, the Germans must reach the British starting line with at least one team.

The following illustration shows the jump-off points after the patrol phase and a opening moves of both players.


In these first phases the British decided to delay as long as possible deploying troops on the table, facing overwhelming odds and fire power. He only deployed a sniper team to make opportunistic pot shots on the German troops.

The German on the other hand brought on the table two sections and the artillery observer, placing successfully a barrage in the second activation. The first section deployed in the road and started moving towards the farm compound, while the second section followed the artillery walking barrage towards the British base line. 

The game looked at this stage a done deal when, as usual "friction" created an unexpected situation: the British ended the turn with a Chain of Command dice and therefore the barrage lifted catching half a German squad in the open, in the ploughed field.  

When the German FO failed to contact the battery to resume the mission, a doble British turn was used to deploy the HMG team a the edge of the ploughed field and two Bren teams behind the wall at the farm compound. 


Firing at close distance, the British made 4 KIAs and first pinned and then broke one of the German teams, fleeing towards the orchard below in the map. Considering the overwhelming fire power of the combined 6 LMG teams, the 150 gun and the off-board mortars, the British took a conservative stance, and pulled back in good order and with no casualties.

A second German victory in the campaign, he will need another 4 victories in a total of 6 remaining games to win the campaign. 

- Photo Report -


British Jump Off Points

German Jump Off Points


Schnell!

German Artillery Observer

British Sniper


Ups! German Team Caught Naked

British Airborne Vickers HMG

British Airborne Bren Teams


Lorraine Schlepper self propelled 150 mm gun

German Squad and Artillery Walking Barrage


Sunday 30 April 2023

Kampfgruppe Von Luck #2 - Scenario 1: Patrol on the Ring Contour

Time and Date: early hours of June 6th, 1944

Location: High ground South of Ranville

The first scenario takes place in the outposts line of the 12th Para. Being the early hours after the first landing, the British platoon forces are widely scattered, with groups of men regrouping towards the landing zones.  In Chain of Command terms this will be a "Scenario 1 ´The Patrol" game. 

The British had a weak platoon missing several teams of their three sections. They had no support points in this first game. The Germans fielded a full Panzer Grenadier platoon with two LMG teams pr section (a lot of firepower) and 4 support points (an Adjutant and a Forward Observer)  

The terrain is basically flat with dense wheatfields covering the area. These wheatfields provide light cover to stationary troops.  After rolling for moral, the British started the patrol phase followed by the Germans. The final location of the jump off points is marked in the map attached.


Although my role in the campaign is to act as umpire, the two German players had conflicting family agendas today, and thus I took their side and played against the British. 

This was a short game. The British opted for an early fast deployment along the hedge line from the two jump off points; the third jump off point far in the bottom of the map was intended to deploy the snipers (but this was not finally the case).

The three German sections deployed from each of the jump off points, while the Senior leader and the artillery observer  deployed from one at the bottom of the map. The German plan was simple: two sections (located mid and upper part of the map) used the overwhelming fire power to pin the British concentration. The third German section moved to captured the isolated jumpoff point and initiate a flank movement, while the artillery observer tried (unsuccessfully) to call the mortars.

The fire of the two German sections killed and routed a significant number of paras,  wounded twice the senior leader and reduced the British Platoon morale level to 4. With their flank now under threat, the British player pulled back and left the field. A first victory to the German side with just casualties.

 - Photo Report -


British Jump Off Points

German Jump Off Points

German Panzer Grenadiers Firing to the British Line


Third German Section and Forward Observer


British Jump Off Point Captured and Initiating Flank Attack

Friday 14 April 2023

Kampfgruppe Von Luck Campaign #1 - Introduction

Some of my boardgame opponents are having problems to attend the Sunday morning club sessions for a few weeks. I'm turning my attention again to miniature wargaming and will spend the rest of April and most of May umpiring one of my favourite Chain of Command campaigns: Kampfgruppe Von Luck.

The start of the campaign is set for Sunday April 23rd and there will be one British and two German players involved. It will also be an opportunity to put on the table for the first time, my British Red Devils platoon painted in 2019! 

My plan is to do a series of after action reports for each of the games of the campaign over the following months. This first post will introduce the main elements of the campaign.

First the historical context. Kampfgruppe Von Luck (KVL from now on) is focused on Operation Tonga, the operations undertaken by the British 6th Airborne Division on the east flank of the Normandy landings and the reaction of the German 21st Panzer Division defending that area during the first hours after the airborne landings

6th Airborne Plan of Operation


The campaign is organised around five maps or "rungs" with the Germans on the offensive. The objective is to capture Le Bas de Ranville, the gate to the German armoured forces to attack the rivers over the Orne. This should be achieved in a maximum of 8 turns or games.

The Germans play with a battalion of the 125th Panzer Grenadier, mainly infantry with some limited armour support, including some of the panzer "rarities" built ad-hoc based on chassis from old 1940 French armour. 

On the other side, the British forces belong to the 12th Para. Although having superiority in men, the British starts the game widely scattered, receiving increasing reinforcements as the campaign advances, but are also light on AT weapons to defend against the armoured German elements.

For more information on the Chain of Command campaigns system, I advise you to take a look to the supplement publication "At the Sharp End"  

From the publisher website:

At the Sharp End allows you to follow the exploits of your force throughout a series of linked games. To succeed you’ll need to keep your men safe, your CO happy whilst ensuring the effectiveness of your key leaders. Included is a complete campaign system covering everything you need to run a campaign with an absolute minimum of effort and paperwork (almost none in fact).

 Three types of campaign options are presented so the gamer can select one to suit the amount of time he has available and the degree of detail he is looking for. The most simple option allows the gamer to start campaigning straight away, whilst the others allow the building of historical campaigns. It’s all there, even down to gallantry awards so you can see your characters develop in action.. The whole At the Sharp End PDF Handbook will serve as a key to be used with Chain of Command campaigns produced by us in our Specials, in magazine articles and as stand-alone supplements, as well as allowing the gamer to build his own campaigns with a minimum of effort.
 
-UPDATE-
Last Sunday was Madrid's Marathon. The access to our club premises was an inferno and some players could not even reach the area. We have postponed the campaign start to Sunday April 30rd

Wednesday 12 April 2023

Lurking into Mordor: Thoughts about The War of the Ring Boardgame


This may come as a surprise to some of my followers: a post about a fantasy game? Were you not a diehard historical gamer?

You, playing a fantasy game??

Well yes and no. As commented in a previous post titled "Board Games vs Miniature Wargames", my wargamer CV shows some early assignments in fantasy-related gaming (both, RPG with D&D and massive battles with Warhammer Fantasy). 

True, for several decades now I have only played historical games and mainly miniatures-based. But in my recent come back to board gaming, I was attracted to a game called "The War of the Ring", after watching the gameplay series on Youtube made by Agustí Barrio (Spain's #1 wargames influencer!). 

Being also a Tolkien fan did not help me to jump into that wagon. And with Father's Day in Spain taking place on March 19th, I just "nudged" my family to swap the traditional tie-and-socks pack for a copy of the game instead.  

Box size comparison: War of Ring vs standard board game


The second edition of the game was released in Spanish by Devir; a very high quality box (the one I own now) with a content that is just... WOW!: a beautifully designed hardboard map; a set of 124 large (12 cm long) events cards; and over 200 minis depicting the different armies from the Shadow Alliance (Orthanc, Mordor and the North & East peoples) and the Free Peoples (Rohan Gondor, Elves and Dwarves Kingdoms, and the Dunedain); and individual models of the main characters (all the Fellowship members, Gollum, the Witch King, Saruman the White, Mouth of Sauron and the nine Nazgul). 

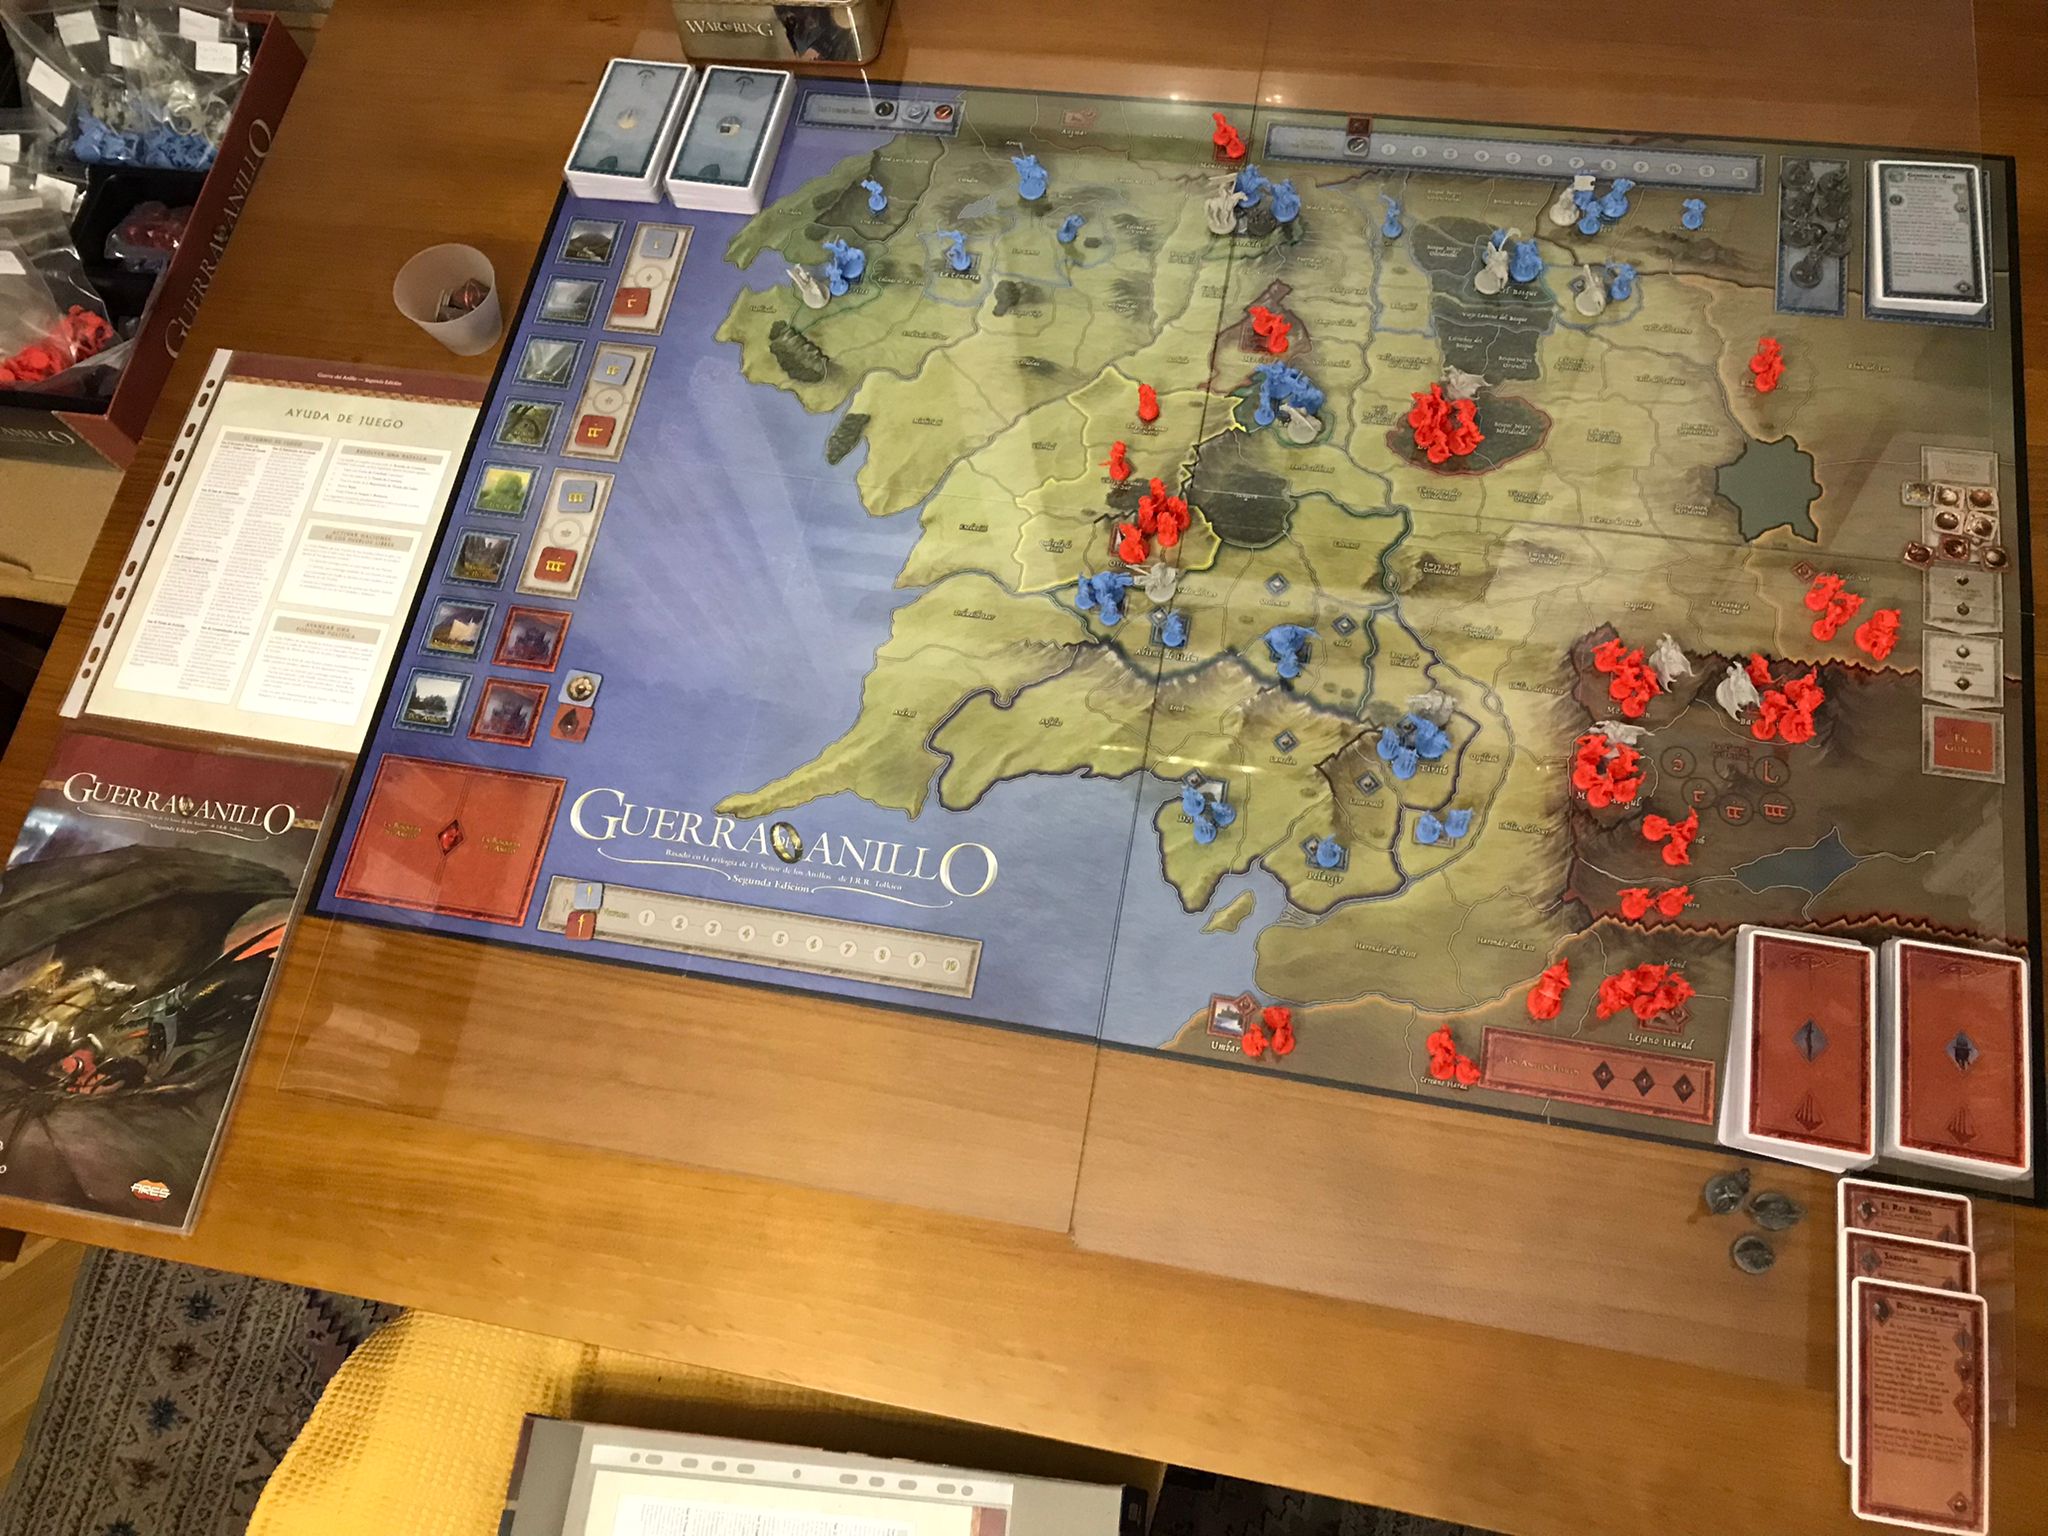
Game display at turn 1: observe reds superiority (Shadow) vs blues (Free Peoples)
 

In addition to the topic covered by this game, the rules design attracted all my attention. At high level, the Free Peoples players main objective is to destroy the Ring by taking it to Mount of Doom in Mordor, while resisting the military tide of Shadow Alliance. At the other side of the Hills, the players controlling the Shadow Alliance must fight, defeat and conquer the Free lands to achieve victory, the Ring playing only a secondary role (albeit still relevant) in the Shadow's plans. 

Witch King, Saruman and Mouth of Sauron
 

In this sense the game is very thematic and fits nicely with the Lord of the Rings book trilogy narrative: the Free Peoples start the game divided, un-alerted, and hardly aware of the threat rising in the East. Only Elves know about the Ring (the Fellowship starts the game at Rivendell) and are getting prepared for war. 

As the Shadow grows and the threat become obvious, the Free Peoples must rush to build their armies... but maybe too late to defeat the might of the Shadow forces. Their only hope to win is buying time for Frodo and the Fellowship to reach Mount Doom and destroy the Ring.
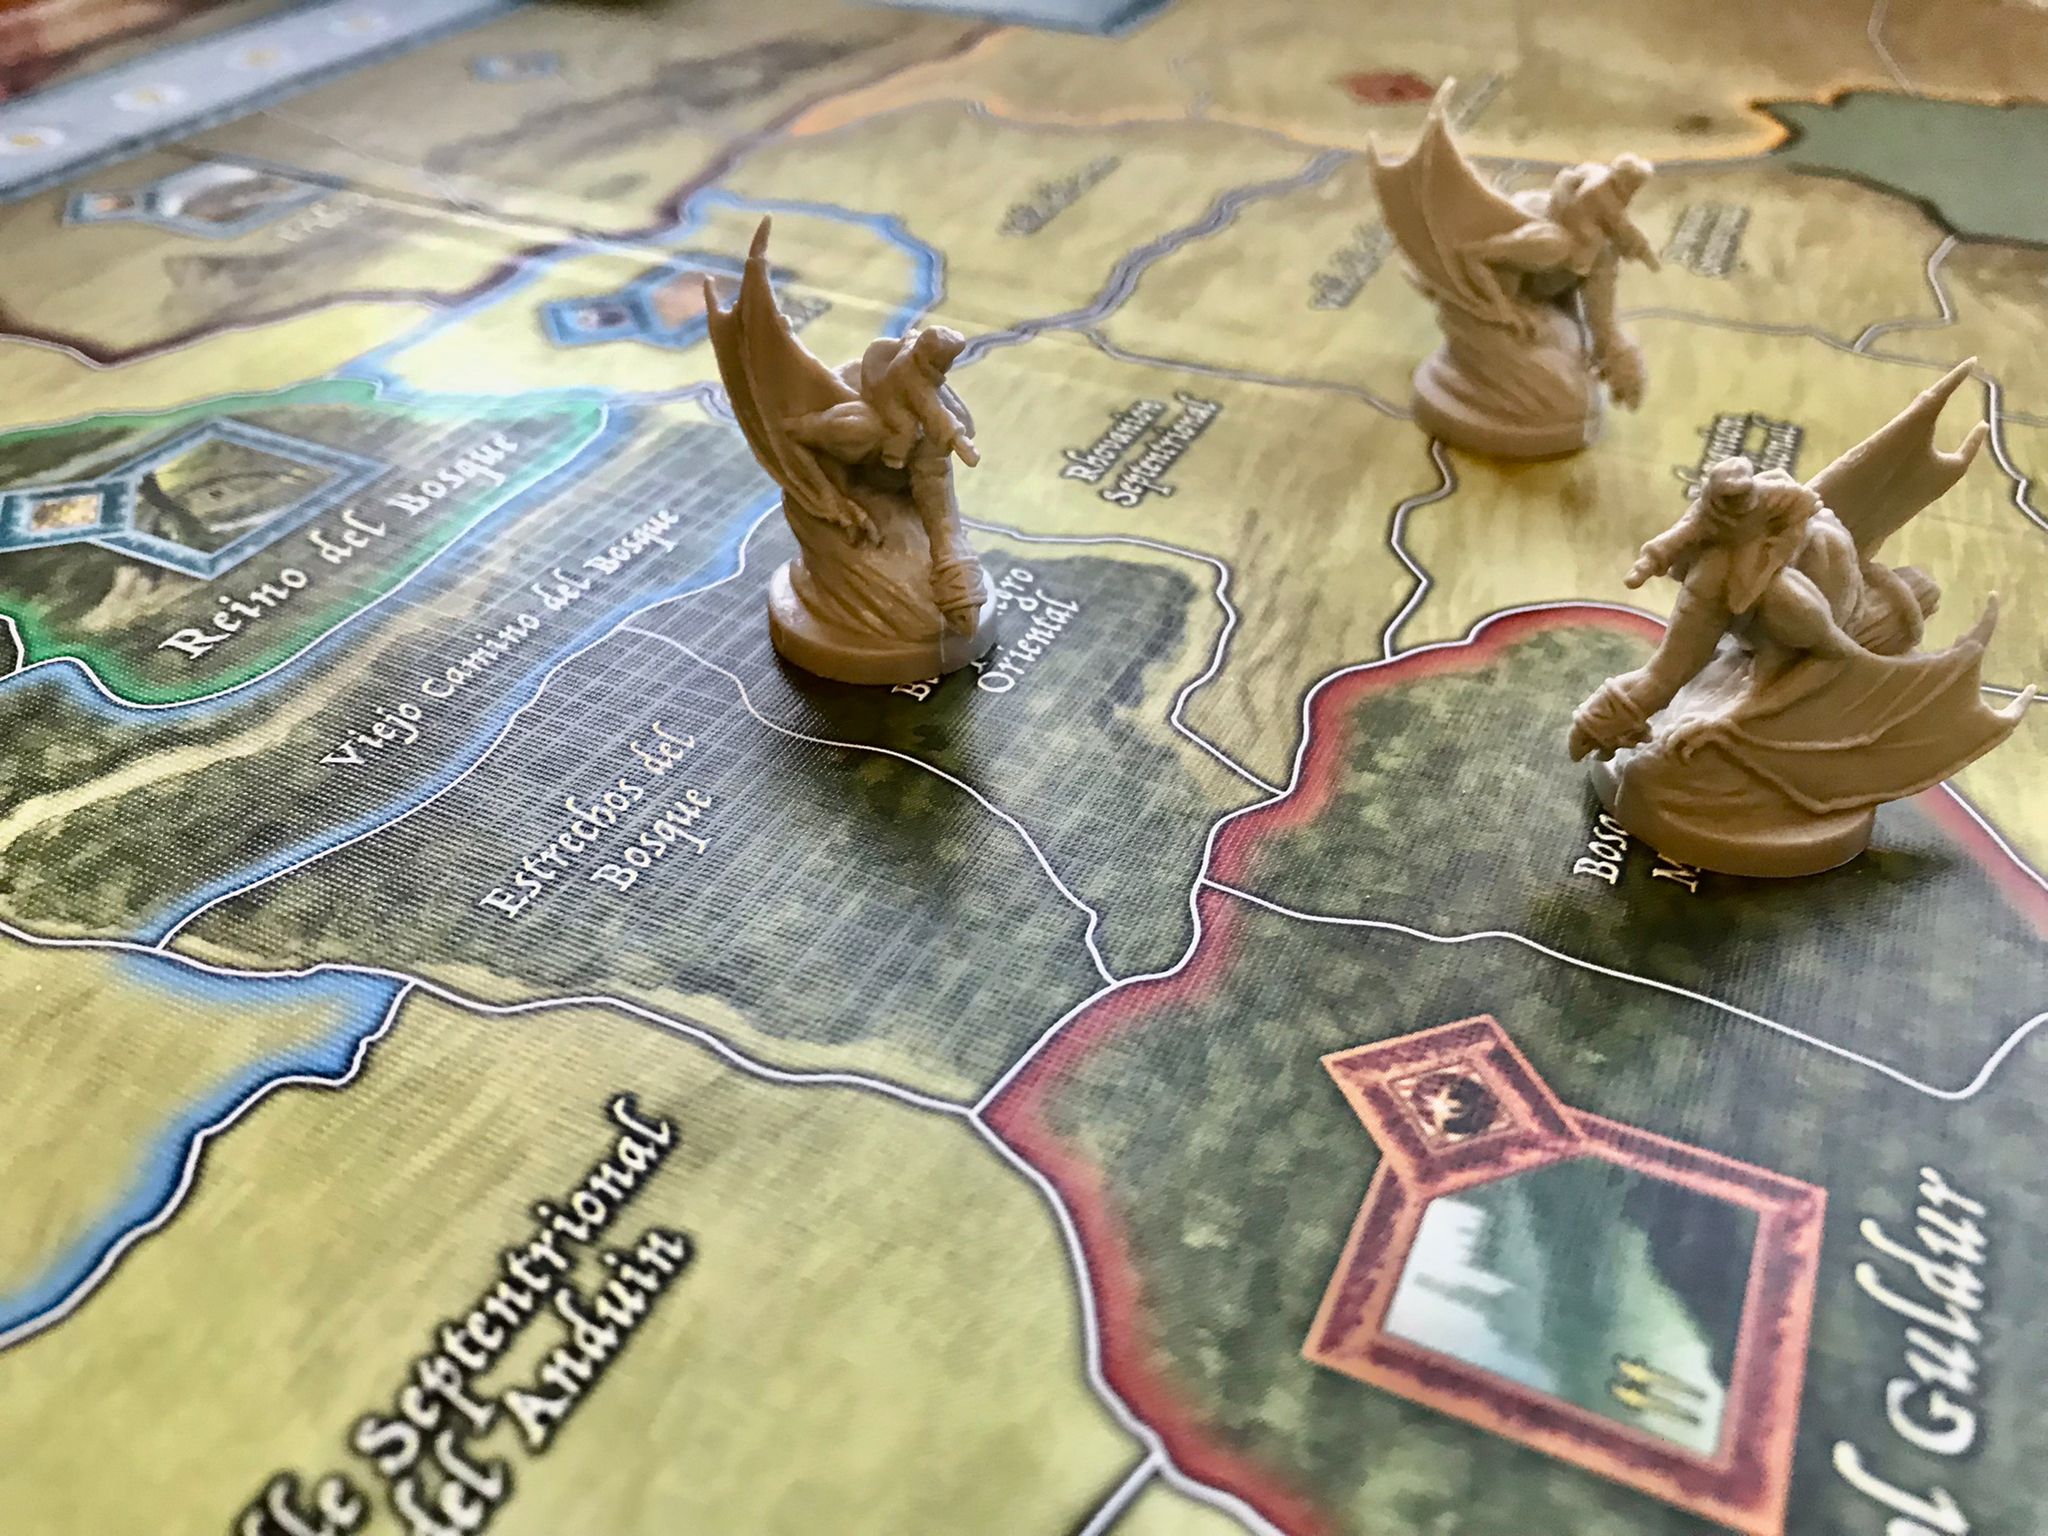
Nazgul! Nazgul!

The Shadow starts the game with significant military forces and very close to reach a "state of war" level. Mighty armies of Orcs, Uruk Hais and men form the North & East will unleash shortly after the game starts, and will overrun Minas Tirith, Edoras, Hemlm's Deep and the main Elven and Dwarven realms. 


How the game works?

Without entering into much detail, this is a game driven by a combination of action dice rolls and a hand of cards. 

Dice have special symbols, and allow players to do different things: play event cards, move characters, move armies, lead attacks, move factions along a political track towards a "State of War" status (needed to recruit troops) or recruit armies.

Action Dice for Free Peoples (blue) and The Shadow (red)
 

Cards can be played either as "events" of many types; or in during the battle segment affecting in different way the combat die rolls.

Add-on: A nice tin box to store the game cards

As commented before, for the Free World player is critical to race towards Mordor and Mount Doom. The designers have a created a very elegant and thematic mechanism to manage the Fellowship, and it's worth explaining with some detail:    

In the case of the Free Peoples, a "sword" die roll allows moving the Fellowships towards Mordor and Mount Doom.  The progress of the fellowship is shown in a track but only when discovered by the Shadow or declared by the Free Peoples player, it is placed in its actual position on the map.

Gollum and the Ring Bearers at Mount Doom


The Shadow player can allocate a number of action dice to detect the Fellowship each time it moves. If successfully detected, he will randomly select a chit from a bag. The chits may force openly revealing the Fellowships location and/or taking a number of hits (from zero to three) on it.  

How do you absorb these hits? Two different ways: either killing a member of the Fellowship (chosen randomly); or suffering "corruption points". If the Fellowship accumulates 12 corruption points, then  Frodo have failed to complete the mission and the Ring is now controlled by Sauron... game over.

There are ways to reduce the Fellowship's balance of accumulated corruption points, either through card events, or revealing the Fellowship in a realm of the Free Peoples at the end of each turn.  The Free People player's dilemma is to decide between the corruption level he's willing to take, the speed toward Mordor (the fastest it goes, the easiest to be discovered) and how many companions he's willing to sacrifice on the way.

Finally, the Shadow can use one or more Nazguls to track the Fellowship, improving the chances of being discovered each time it moves. 

Once in Mordor and climbing Mount Doom, the Fellowship runs much higher odds of being discovered and therefore "corrupted"; again a very thematic part of the game, reflecting Frodo's mental and physical exhaustion in the final lap of the trip. Noteworthy, Gollum leads the Fellowship once inside Mordor, providing some benefits to the Ring bearer. 

The Fellowship Move and Corruption Track

While the central drama with the Fellowship unfolds, the Free Peoples player must buy time and defend the key locations in the map from the mighty armies of the Shadow. To achieve a military victory is almost impossible, as the Shadow have infinite resources and the Free Peoples player only a limited number of assets: Free Peoples battle casualties are lost for the rest of the game, while the Shadow's are recycled and can return as reinforcements.

Finally, there is room also to play with the main characters during the game. For example, Aragorn starts the game as "Strider"; but if he leaves the Fellowship and emerges in Gondor, he'll declare as Isildur's heir and become "Aragorn", adding some special features for the Free Peoples players. Moving Aragorn to  Helm's Deep or Minas Tirith substantially improves the defensive options of these two strongholds, denying the Shadow a significant number of victory points.

The Fellowship


Gandalf on the other hand, starts the game leading the Fellowship as "Gandalf the Grey". If he dies during the game, it can reappear as "Gandalf the White" with some special features as well.


Main Characters Cards

First impressions of the game

I have played so far a solo game, and a couple games in my local club. These games were great: tense, funny, thematic. And it can be replayed as many times as you want: each side's the card deck helds 48 cards; and in the games that I have played so far we have never run out of cards.

My initial advice to a Shadow player is to early invest in building large armies (Sauron is a factory of mass-producing Ururk Hais) and therefore move quickly through the political track towards the "State of War" position (players can only recruit troops once reaching that box). Hit early and hit hard to accumulate as many victory points as possible.

Political Tracker
At the other side of the hill, the Free People player is in permanent tension between reinforcing armies and moving the Fellowship to Mordor. As the Free People factions are far up in the political track, it can be expensive to invest action dice in moving the factions towards the "State of War" box. 

Best strategy advice for the Free Peoples players: use as many event cards as possible in your hand to recruit troops, keeping a close eye on who (Suaron or Saruman) is likely to strike first: 

Although Saruman shares border with Rohan, the wizard does not start the game deployed, he needs to be brought on the table. 

Sauron on the other hand, starts with a fragmented army in diffrent locations within Mordor. Before striking Gondor, he needs to concentrate and reinforce his forces.

This can provide some initial relief to the Free Peoples player. But be wary, because a good hand of cards on either side can substantially change the opening moves of the players.  


Wrapping up

The War of the Ring is great game in all dimensions: it perfectly captures the atmosphere of Tolkien's Lor fo The ring narrative; its extremely well balanced and both sides have options to win the game (albeit using different strategies, as commented above); the rules are complex-free and easy to play almost from the start; it is fun to play; and, finally, thanks to the dice-card driven engine, it is highly replayable. Cannot recommend more.