Sunday 30 April 2023

Kampfgruppe Von Luck #2 - Scenario 1: Patrol on the Ring Contour

Time and Date: early hours of June 6th, 1944

Location: High ground South of Ranville

The first scenario takes place in the outposts line of the 12th Para. Being the early hours after the first landing, the British platoon forces are widely scattered, with groups of men regrouping towards the landing zones.  In Chain of Command terms this will be a "Scenario 1 ´The Patrol" game. 

The British had a weak platoon missing several teams of their three sections. They had no support points in this first game. The Germans fielded a full Panzer Grenadier platoon with two LMG teams pr section (a lot of firepower) and 4 support points (an Adjutant and a Forward Observer)  

The terrain is basically flat with dense wheatfields covering the area. These wheatfields provide light cover to stationary troops.  After rolling for moral, the British started the patrol phase followed by the Germans. The final location of the jump off points is marked in the map attached.


Although my role in the campaign is to act as umpire, the two German players had conflicting family agendas today, and thus I took their side and played against the British. 

This was a short game. The British opted for an early fast deployment along the hedge line from the two jump off points; the third jump off point far in the bottom of the map was intended to deploy the snipers (but this was not finally the case).

The three German sections deployed from each of the jump off points, while the Senior leader and the artillery observer  deployed from one at the bottom of the map. The German plan was simple: two sections (located mid and upper part of the map) used the overwhelming fire power to pin the British concentration. The third German section moved to captured the isolated jumpoff point and initiate a flank movement, while the artillery observer tried (unsuccessfully) to call the mortars.

The fire of the two German sections killed and routed a significant number of paras,  wounded twice the senior leader and reduced the British Platoon morale level to 4. With their flank now under threat, the British player pulled back and left the field. A first victory to the German side with just casualties.

 - Photo Report -


British Jump Off Points

German Jump Off Points

German Panzer Grenadiers Firing to the British Line


Third German Section and Forward Observer


British Jump Off Point Captured and Initiating Flank Attack

Friday 14 April 2023

Kampfgruppe Von Luck Campaign #1 - Introduction

Some of my boardgame opponents are having problems to attend the Sunday morning club sessions for a few weeks. I'm turning my attention again to miniature wargaming and will spend the rest of April and most of May umpiring one of my favourite Chain of Command campaigns: Kampfgruppe Von Luck.

The start of the campaign is set for Sunday April 23rd and there will be one British and two German players involved. It will also be an opportunity to put on the table for the first time, my British Red Devils platoon painted in 2019! 

My plan is to do a series of after action reports for each of the games of the campaign over the following months. This first post will introduce the main elements of the campaign.

First the historical context. Kampfgruppe Von Luck (KVL from now on) is focused on Operation Tonga, the operations undertaken by the British 6th Airborne Division on the east flank of the Normandy landings and the reaction of the German 21st Panzer Division defending that area during the first hours after the airborne landings

6th Airborne Plan of Operation


The campaign is organised around five maps or "rungs" with the Germans on the offensive. The objective is to capture Le Bas de Ranville, the gate to the German armoured forces to attack the rivers over the Orne. This should be achieved in a maximum of 8 turns or games.

The Germans play with a battalion of the 125th Panzer Grenadier, mainly infantry with some limited armour support, including some of the panzer "rarities" built ad-hoc based on chassis from old 1940 French armour. 

On the other side, the British forces belong to the 12th Para. Although having superiority in men, the British starts the game widely scattered, receiving increasing reinforcements as the campaign advances, but are also light on AT weapons to defend against the armoured German elements.

For more information on the Chain of Command campaigns system, I advise you to take a look to the supplement publication "At the Sharp End"  

From the publisher website:

At the Sharp End allows you to follow the exploits of your force throughout a series of linked games. To succeed you’ll need to keep your men safe, your CO happy whilst ensuring the effectiveness of your key leaders. Included is a complete campaign system covering everything you need to run a campaign with an absolute minimum of effort and paperwork (almost none in fact).

 Three types of campaign options are presented so the gamer can select one to suit the amount of time he has available and the degree of detail he is looking for. The most simple option allows the gamer to start campaigning straight away, whilst the others allow the building of historical campaigns. It’s all there, even down to gallantry awards so you can see your characters develop in action.. The whole At the Sharp End PDF Handbook will serve as a key to be used with Chain of Command campaigns produced by us in our Specials, in magazine articles and as stand-alone supplements, as well as allowing the gamer to build his own campaigns with a minimum of effort.
 
-UPDATE-
Last Sunday was Madrid's Marathon. The access to our club premises was an inferno and some players could not even reach the area. We have postponed the campaign start to Sunday April 30rd

Wednesday 12 April 2023

Lurking into Mordor: Thoughts about The War of the Ring Boardgame


This may come as a surprise to some of my followers: a post about a fantasy game? Were you not a diehard historical gamer?

You, playing a fantasy game??

Well yes and no. As commented in a previous post titled "Board Games vs Miniature Wargames", my wargamer CV shows some early assignments in fantasy-related gaming (both, RPG with D&D and massive battles with Warhammer Fantasy). 

True, for several decades now I have only played historical games and mainly miniatures-based. But in my recent come back to board gaming, I was attracted to a game called "The War of the Ring", after watching the gameplay series on Youtube made by Agustí Barrio (Spain's #1 wargames influencer!). 

Being also a Tolkien fan did not help me to jump into that wagon. And with Father's Day in Spain taking place on March 19th, I just "nudged" my family to swap the traditional tie-and-socks pack for a copy of the game instead.  

Box size comparison: War of Ring vs standard board game


The second edition of the game was released in Spanish by Devir; a very high quality box (the one I own now) with a content that is just... WOW!: a beautifully designed hardboard map; a set of 124 large (12 cm long) events cards; and over 200 minis depicting the different armies from the Shadow Alliance (Orthanc, Mordor and the North & East peoples) and the Free Peoples (Rohan Gondor, Elves and Dwarves Kingdoms, and the Dunedain); and individual models of the main characters (all the Fellowship members, Gollum, the Witch King, Saruman the White, Mouth of Sauron and the nine Nazgul). 

Game display at turn 1: observe reds superiority (Shadow) vs blues (Free Peoples)
 

In addition to the topic covered by this game, the rules design attracted all my attention. At high level, the Free Peoples players main objective is to destroy the Ring by taking it to Mount of Doom in Mordor, while resisting the military tide of Shadow Alliance. At the other side of the Hills, the players controlling the Shadow Alliance must fight, defeat and conquer the Free lands to achieve victory, the Ring playing only a secondary role (albeit still relevant) in the Shadow's plans. 

Witch King, Saruman and Mouth of Sauron
 

In this sense the game is very thematic and fits nicely with the Lord of the Rings book trilogy narrative: the Free Peoples start the game divided, un-alerted, and hardly aware of the threat rising in the East. Only Elves know about the Ring (the Fellowship starts the game at Rivendell) and are getting prepared for war. 

As the Shadow grows and the threat become obvious, the Free Peoples must rush to build their armies... but maybe too late to defeat the might of the Shadow forces. Their only hope to win is buying time for Frodo and the Fellowship to reach Mount Doom and destroy the Ring.

Nazgul! Nazgul!

The Shadow starts the game with significant military forces and very close to reach a "state of war" level. Mighty armies of Orcs, Uruk Hais and men form the North & East will unleash shortly after the game starts, and will overrun Minas Tirith, Edoras, Hemlm's Deep and the main Elven and Dwarven realms. 


How the game works?

Without entering into much detail, this is a game driven by a combination of action dice rolls and a hand of cards. 

Dice have special symbols, and allow players to do different things: play event cards, move characters, move armies, lead attacks, move factions along a political track towards a "State of War" status (needed to recruit troops) or recruit armies.

Action Dice for Free Peoples (blue) and The Shadow (red)
 

Cards can be played either as "events" of many types; or in during the battle segment affecting in different way the combat die rolls.

Add-on: A nice tin box to store the game cards

As commented before, for the Free World player is critical to race towards Mordor and Mount Doom. The designers have a created a very elegant and thematic mechanism to manage the Fellowship, and it's worth explaining with some detail:    

In the case of the Free Peoples, a "sword" die roll allows moving the Fellowships towards Mordor and Mount Doom.  The progress of the fellowship is shown in a track but only when discovered by the Shadow or declared by the Free Peoples player, it is placed in its actual position on the map.

Gollum and the Ring Bearers at Mount Doom


The Shadow player can allocate a number of action dice to detect the Fellowship each time it moves. If successfully detected, he will randomly select a chit from a bag. The chits may force openly revealing the Fellowships location and/or taking a number of hits (from zero to three) on it.  

How do you absorb these hits? Two different ways: either killing a member of the Fellowship (chosen randomly); or suffering "corruption points". If the Fellowship accumulates 12 corruption points, then  Frodo have failed to complete the mission and the Ring is now controlled by Sauron... game over.

There are ways to reduce the Fellowship's balance of accumulated corruption points, either through card events, or revealing the Fellowship in a realm of the Free Peoples at the end of each turn.  The Free People player's dilemma is to decide between the corruption level he's willing to take, the speed toward Mordor (the fastest it goes, the easiest to be discovered) and how many companions he's willing to sacrifice on the way.

Finally, the Shadow can use one or more Nazguls to track the Fellowship, improving the chances of being discovered each time it moves. 

Once in Mordor and climbing Mount Doom, the Fellowship runs much higher odds of being discovered and therefore "corrupted"; again a very thematic part of the game, reflecting Frodo's mental and physical exhaustion in the final lap of the trip. Noteworthy, Gollum leads the Fellowship once inside Mordor, providing some benefits to the Ring bearer. 

The Fellowship Move and Corruption Track

While the central drama with the Fellowship unfolds, the Free Peoples player must buy time and defend the key locations in the map from the mighty armies of the Shadow. To achieve a military victory is almost impossible, as the Shadow have infinite resources and the Free Peoples player only a limited number of assets: Free Peoples battle casualties are lost for the rest of the game, while the Shadow's are recycled and can return as reinforcements.

Finally, there is room also to play with the main characters during the game. For example, Aragorn starts the game as "Strider"; but if he leaves the Fellowship and emerges in Gondor, he'll declare as Isildur's heir and become "Aragorn", adding some special features for the Free Peoples players. Moving Aragorn to  Helm's Deep or Minas Tirith substantially improves the defensive options of these two strongholds, denying the Shadow a significant number of victory points.

The Fellowship


Gandalf on the other hand, starts the game leading the Fellowship as "Gandalf the Grey". If he dies during the game, it can reappear as "Gandalf the White" with some special features as well.


Main Characters Cards

First impressions of the game

I have played so far a solo game, and a couple games in my local club. These games were great: tense, funny, thematic. And it can be replayed as many times as you want: each side's the card deck helds 48 cards; and in the games that I have played so far we have never run out of cards.

My initial advice to a Shadow player is to early invest in building large armies (Sauron is a factory of mass-producing Ururk Hais) and therefore move quickly through the political track towards the "State of War" position (players can only recruit troops once reaching that box). Hit early and hit hard to accumulate as many victory points as possible.

Political Tracker
At the other side of the hill, the Free People player is in permanent tension between reinforcing armies and moving the Fellowship to Mordor. As the Free People factions are far up in the political track, it can be expensive to invest action dice in moving the factions towards the "State of War" box. 

Best strategy advice for the Free Peoples players: use as many event cards as possible in your hand to recruit troops, keeping a close eye on who (Suaron or Saruman) is likely to strike first: 

Although Saruman shares border with Rohan, the wizard does not start the game deployed, he needs to be brought on the table. 

Sauron on the other hand, starts with a fragmented army in diffrent locations within Mordor. Before striking Gondor, he needs to concentrate and reinforce his forces.

This can provide some initial relief to the Free Peoples player. But be wary, because a good hand of cards on either side can substantially change the opening moves of the players.  


Wrapping up

The War of the Ring is great game in all dimensions: it perfectly captures the atmosphere of Tolkien's Lor fo The ring narrative; its extremely well balanced and both sides have options to win the game (albeit using different strategies, as commented above); the rules are complex-free and easy to play almost from the start; it is fun to play; and, finally, thanks to the dice-card driven engine, it is highly replayable. Cannot recommend more.


Monday 3 April 2023

What Makes Operation Market Garden so Appealing?

Territorio Grognard is arguably one of the best hobby podcasts in Spanish dedicated to board wargaming. In late February, they recorded an episode on Operation Market Garden (Sept 17th-27th, 1944), coinciding with the release of a Spanish edition of GMT's Mark Simonitch Holland '44 game by NAC Wargames.

Source: Imperial War Museum
 

I know Franjo one of the podcast producers and, as I am a fan of all things Market Garden, he contacted me to make a short intervention in this episode explaining what makes this operation so appealing to me. 

A simple question doesn't mean a simple answer. True,  Maket Garden is one of my favourite Second World War operations; but I never structured my thoughts on why. It may be related to the fact that in the summer of 1977, I was studying English in London and had the opportunity to watch A Bridge Too Far in the theaters there. But I got really hooked on the topic more recently, after listening to Nick Skinner (founder partner of Too Fat Lardies with Richard Clarke) disucssing the operation in one of the Oddcasts

But returning to the original question, I think we should put it in a different way: what doesn't have Market Garden to be one of the most appealing moments in the 2WW?

Firstly, it is a daring and very bold plan, aiming to cut the war short. Intriguingly, the operation was proposed by Field Marshal Montgomery himself, usually considered (wrongly!?) one the most cautious Allied commanders.

Second, it is one if not the most, epic operation of the whole war. A thrust into Germany to build a bridgehead over the Rhine, outflanking the main defence lines at the Ruhr area ... and to Berlin and beyond.  
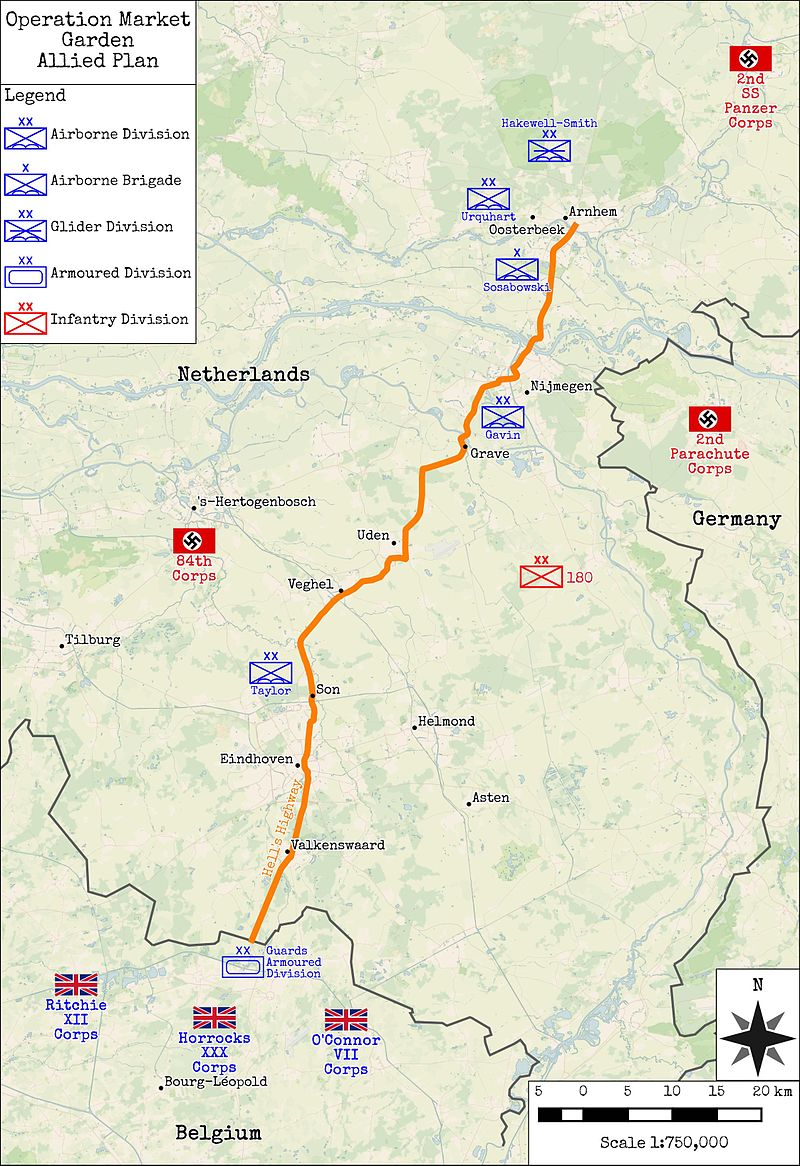
Source: Wikipedia

For this purpose, three airborne divisions (US 101st and 82nd, and British 1st) would jump in a corridor over 100km long behind the enemy lines, while a powerful armoured force (The British XXX Corps of the 21st Army Group) would advance and connect the three landing zones. 

The task of the three airborne divisions was to capture and defend nine critical bridges, spanning over six major riveras and canals in The Netherlands, until being relieved by the land forces.

For a wargamer, Operation Market Garden opens a wide array of gaming opportunities at different levels, from high strategic-operational levels to very low tactical encounters. 

Boardgames are probably best suited for the former. Historically, the airborne landings caught the Germans by surprise and were a total success. 

However, these prompted a fast and violent reaction, completely unexpected by the Allied planners, who thought the Germans on the ground were just second rate units and demoralised beyond recovery.

The Germans counterattacks threatening the XXX Corps line of supply along route 69 (the famous "Hell's Highway"), and the fighting to control some of the key bridges along the route are a fantastic context for operational-level games (more on this later). In parallel to the XXX Corps thrust, the US airborne units must simultaneously take and control bridges, defend the landing zones (needed to bring supplies and reinforcements) and retain control of route 69.

British landing and Attacking Routes
The 1st British Airborne Division  jumped at the tipping point of the Market Garden plan. It went almost immediately on the defensive after landing due to the quick reaction of the local scattered German forces, initially forming around the so-called Kampfgruppe Krafft; but later in a more organised way around the assets of two SS divisions (9th and 10th) refitting in the area .  

Therefore, a high level game would see lots of action around the supply routes as the German pressure increases in the post-landing reaction, attacking even at very unfavourable odds. Allied players will have to assume two opposite roles: on the offensive in the south with the armoured corps to link with the different airborne divisions; and defensive in the north to defend any initial gains made in the Arnhem/Oosterbeek area. And players (or group of players) on both sides would have to run against the clock!

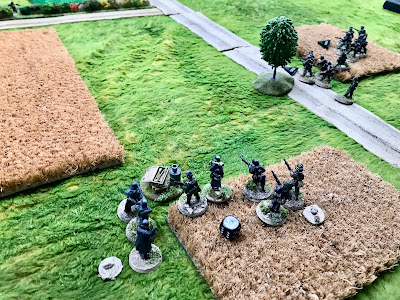
The possibilities for low level games using miniatures are also endless. Most wargamers have focused mainly in the desperate battles of the British Airborne Division in Arnhem and surroundings (see for example the event last October at the Oosterbeek Museum organized by TooFatLardies). 

While epic and heroic, there are many other alternative scenarios to be played at the scale of battalion or platoon with US Airborne division or with detachments of the XXX Corps: attacks and counterattacks around key bridges; contested epic river crossings; urban fighting (Nijmegen for example); ambush actions on British armoured vanguards... Also noteworthy the variety of army units and motorised hardware used by the Germans to create very attractive visual displays on the gaming tables.

Wargaming Market Garden

In the podcast commented above, I was also put a couple of follow up questions: my favourite wargames to play the operation and reading recommendations.

As for wargaming, my first time recreating market garden was with Storm over Arnhem (SOA), a venerable and iconic game released by the defunct Avalon Hill in the 1980s. This was one (if not the first) to use the area-impulse mechanism instead of the traditional hex-grid map, a revolutionary change at the time. As the title suggests, the game is focused on the British Airborne Division's desperate fight for the bridge at the Arnhem-Oosterbeek area. 

The two more recent games I have been playing cover Market Garden fully at operational level: Monty's Gamble and Holland '44

Monty's Gamble fom Multi Man Publishing is another area impulse based game but with a more sophisticated level of development than SOA.  I own the second edition released in 2019 and still widely available in hobby shops. The rules are reasonably simple to learn and the game is highly replayable. 


Monty's Gamble Board

 
SOA Board

Holland '44 form the GMT stable and designed by Mark Simonitch, is my number #1 game for Market Garden. Although more complex than Monty's Gamble, it is fairly accesible for anyone with some track record in playing wargames (but I wouldn't recommend to get anyone introduced to the hobby).

 The game is a very realistic portray of the operation, offering both Allied and Germans opportunities to win based on the different victory conditions. I have played it several times; the game helps to understand the tough choices of the Allied forces (racing to the north but forced to keep the lines of supply open at the same time), and the problems faced to the Germans receiving piecemeal but increasingly larger reinforcements to defeat the Allies.

The recently released Spanish version of the game by NAC Wargames is a work of love: incredible high-quality components (pre-cut counters,  mounted and paper maps, support tables...), a new scenario published in C3i and a new revised and upgraded edited version of the rules. In fact (confession time) I sold my original GMT English copy to acquire the new NAC edition after watching an unboxing video...and  no regrets so far.

On the miniature gaming side (see my previous post discussing board vs miniature gaming), Chain of Command is my best option to play skirmish level actions, as explained before. Too Fat Lardies co-founder Nick Skinner has been working and testing extensively a supplement or handbook focused on Market Garden, that we expect to see released sometime in 2023. 


Notably, TFL organised a game day at the Airborne Museum in Oosterbeek in October 2022 and I have just heard the news in a recent Oddcast that a new event is scheduled at the museum premises by the end of October 2023.

Operation Market Garden: What to read?


Cornelius Ryan "A Bridge Too Far" is the early, and now classical work on Operation market garden, that supported the script of the epic film with the same title.

Unfortunately, the book (unlike the film) has not aged well, and some key wrong ideas and facts about the operation have become undisputed myths over time.

More modern works and research are removing some of these myths or questioning decisions taken by some Allied leaders on the ground, like Gavin of the US 82nd Airborne.

For an overview of the whole operation, I recommend  "The Battle for the Bridges" by Anthony Beevor, released in 2018. Note: I'm not a devoted fan of this military historian and has found his books to be quite irregular. 

But this is a good book to start, despite that some of the myths commented above still survive in his work (for example, the famous "stop to brew tea" of the Guards tanks in Nijmegen after taking the bridge over the Waal).

Robin Neilland's "The Battle for the Rhine 1944" covers the battles from the Normandy breakouts to the Ardennes, and helps put in context the two landmark operations of this period (Market Garden and Watch Am Rhine). This late British historian reviews in depth and makes a strong case in favour of the odds of success of Market Garden.

I have two favourite books that usually I read every year. The first is Martin Middlebrook's "Arnhem the Airborne Battle"  dealing with the fight of the British Airborne Division. It is a book rich in details, using first hand views based on veterans' personal letters, diaries and interviews,  and extremely well written and documented.

The second is focused on the other side of the hill: Robert Kershaw's "It Never Snows in September". This book tells the story from the German point of view and it is the perfect complement when you read Middlebrook's for example. Also extremely well written and documented, provides a detail review on how and why the German reacted so fast to the landings, as well as a critical view of some of the Allied actions and decisions. A must-have.   

Finally, I'd like to bring your attention to a short, widely unknown but intriguing and interesting research study written by Dutch military historian R.G. Poulussen and titled "Lost at Nijmegen: A Rethink on Operation Market Garden".

As the title suggest, the author's argue that Market Garden's main fault was Gavin's procrastinating to take and secure the bridges over the Waal river. The XXX Corps' armoured spear points actually arrived to Nijmegen within schedule despite the problems faced earlier in the operation, only to find the bridges still under German control. 

This had a twofold impact: it forced the British units allocated to reach Arnhem to fight a battle to control the bridges; and for the Germans, once Frost's resistance crumbled at the Arnhem bridge, the delay allowed them to fortify and reinforce the section between Nijmegen and Arnhem (The "Island") forfeiting any possibility of the Allies to reach and capture the bridge over the Rhine.


Thank you for reading this. Do you have any special operation or battle close to your heart? Feel free to leave your comments